Body
Conference Calls
How to prepare for your first conference call
Before you can host a conference call, you must choose a host PIN and an attendee access code by following the instructions below. The host PIN is used during a conference call by the host and is different than your voicemail PIN, while the attendee access code is used during a conference call by the attendees.
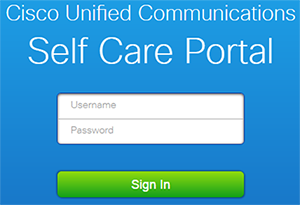
- Go to the Cisco Self-Care Portal.
- Enter your username (in the form of firstnamelastname e.g. johnsmith5) in the Username field and your password in the Password field.

- Click Sign In.
- In the top menu, click General Settings.

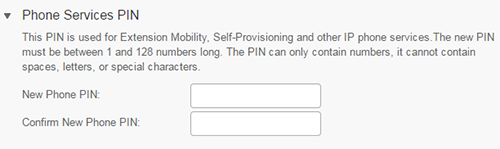
- In order to choose a host PIN, scroll down to the "Phone Services PIN" section and enter a new PIN in both the New Phone PIN and the Confirm New Phone PIN fields.
- Click Save.
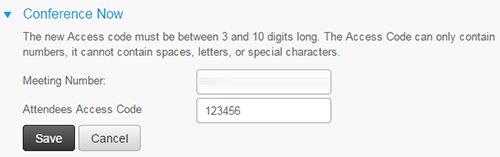
- In the "Conference Now" section, enter a new access code in the Attendees Access Code field.
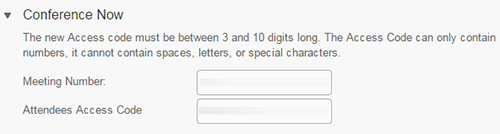
- Click inside the Meeting Number field (where your extension number is listed).
- Click Save.
How to host a conference call
You can have one host and up to 7 attendees during a conference call.
- Ensure that you have followed the first-time instructions to prepare for the conference call.
- Provide the following information to your attendees:
- Meeting date and time: Attendees can start joining before the host, but the conference call is dropped if the host does not join within 15 minutes.
- a phone number to call: 7822 on campus, 604.990.7822 off-campus
- meeting number: Your extension
- attendee access code: The attendee access code you have chosen
- At the time of the meeting, join the conference call:
- Dial 7822 on campus or 604.990.7822 off-campus.
- When prompted, enter the meeting number (your extension) followed by # (pound).
- When prompted, enter your host PIN followed by # (pound).
Note: The host PIN and the voicemail PIN are two different PINs.
- You will join the conference call as soon as you enter the PIN.
- You will hear a tone when attendees join.
How to join a conference call as an attendee
- At the time of the meeting, dial 7822 on campus or 604.990.7822 off-campus.
- When prompted, enter the meeting number provided by your host.
- When prompted for a PIN, press # (pound).
- When prompted, enter the attendee access code provided by the host.
- If the host has not joined yet, you will hear hold music.
Using Your Phone
Key features of the Cisco office phones
For a review of all the features on your Cisco office phone, please read the CiscoPhone7945 (pdf) or the CiscoPhone7962 (pdf). The model number of your Cisco office phone can be found in the top-right corner of the phone.
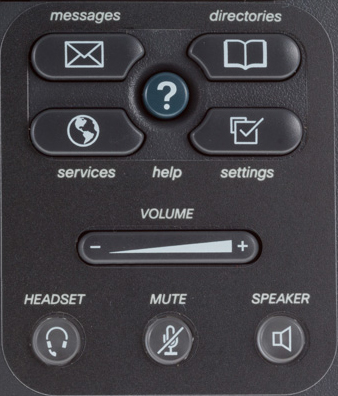
- Messages: Pressing this button will dial your voicemail so you can check voicemails or change the settings on your voicemail (guide on how to use your voicemail)
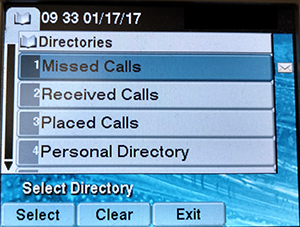
- Directories: Pressing this button allows you to check missed calls, received calls and placed calls. The fifth option called Corporate Directory allows you to search for other Capilano University employees.
In order to move between the different options, use the up and down arrow buttons below your phone screen. In order to see the calls or use the Corporate Directory, use the checkmark button once you have selected an option.
- Settings: Pressing this button allows you to customize your ringtone (Rings menu within User Preferences) or find out more information about the phone.

- Volume and Mute: The Volume button allows you to control the volume of your ringtone (when you are not on a call) and the volume of the handset speaker (when you are on a call). The Mute button allows you to mute your handset.
How to dial out on the Cisco office phones
In order to dial out, enter 9 before the phone number (there is no need to wait for a dial tone).
How to change your ring settings with the Cisco Self-Care Portal
- Go to the Cisco Self-Care Portal.
- Enter your username (in the form of firstnamelastname e.g. johnsmith5) in the Username field and your password in the Password field.

- Click Sign In.
- In the left side menu, click Phone Settings.

- Click Ring Settings.
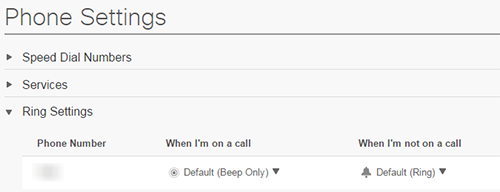
- Choose to modify the ringtone for when you are on a call or when you are not on a call (or both). For each:
- Click the down-pointing arrow next to the current choice.
- Click the option that you wish to select:
- Do Nothing: Phone will not flash the handset light or ring
- Flash Only: Phone will flash the handset light (no sound)
- Ring Once: Phone will ring only once
- Ring: Phone will ring continuously
- Beep Only: Phone will beep instead of ringing
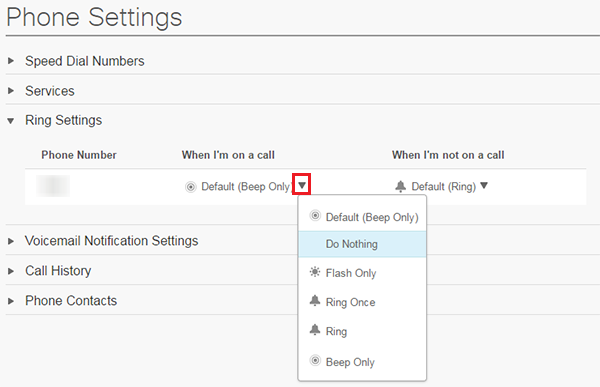
- Click Save.
How to forward your calls
You can forward the current call or all your future calls.
- To forward the current call:
- While on the current call, press the Transfer button.

- Enter the phone number you wish to forward the current call.
The phone will put the current call on hold and connect you to the person you wish to forward it to. You can speak to the person you are forwarding to before forwarding the call.
- Press the Transfer button to forward the call.
- To forward all future calls from your phone:
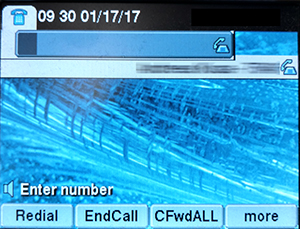
- Press the CFwdALL button.
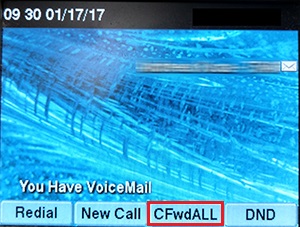
- Enter the phone number to which you wish to forward all your calls. If you are forwarding to an outside number add a 9 in front of the full number including the area code — 96049901234.
- The screen will show Forwarded followed by the phone number you have entered.
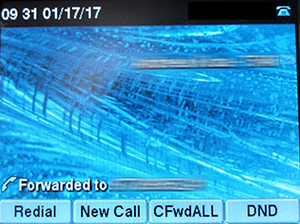
- If you wish to turn off forwarding, simply press the CFwdALL button again.
- To forward all future calls from the Cisco Self-Care Portal:
- Go to the Cisco Self-Care Portal.
- Enter your username (in the form of firstnamelastname e.g. johnsmith5) in the Username field and your password in the Password field.
- Click Sign In.
- In the left side menu, click Call Forwarding.
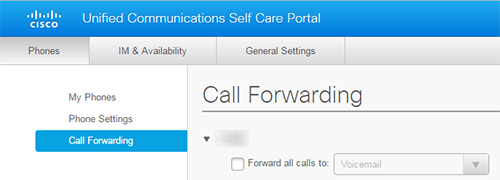
- Select Forward all calls to.
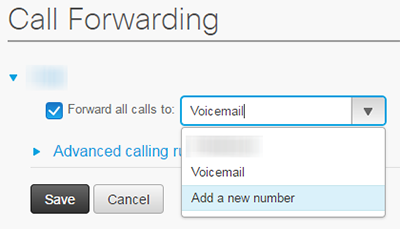
- From the drop-down list, choose to Add a new number.
- Add a 9 to the beginning and enter the phone number, including the area code (e.g. 97781234567).
In the future, the phone number will appear in the drop-down list for quick selection.
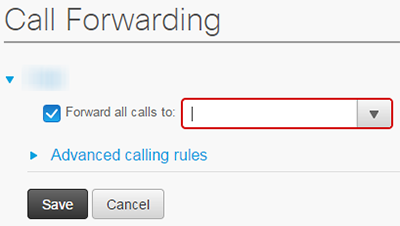
- Click Save.
- If you wish to turn off forwarding, deselect Forward all calls to and click Save.
How to set Do Not Disturb
Do Not Disturb (DND) allows you to mute the phone ringer. When a call comes in, the phone screen will show the incoming call as usual and you can answer the call.
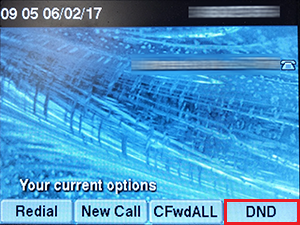
- To set Do Not Disturb from your phone:
- To turn Do Not Disturb on: Press the DND button.
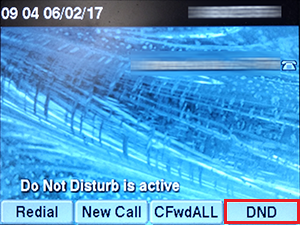
- To turn Do Not Disturb off: While the phone states "Do Not Disturb is active", press the DND button.
- To set Do Not Disturb from the Cisco Self-Care Portal:
- Go to the Cisco Self-Care Portal.
- Enter your username (in the form of firstnamelastname e.g. johnsmith5) in the Username field and your password in the Password field.

- Click Sign In.
- In the top menu, click IM & Availability.
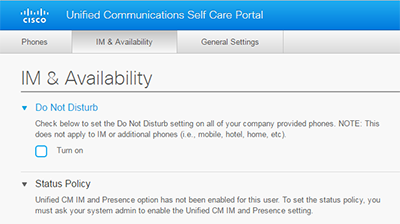
- To turn Do Not Disturb on: Select Turn on.
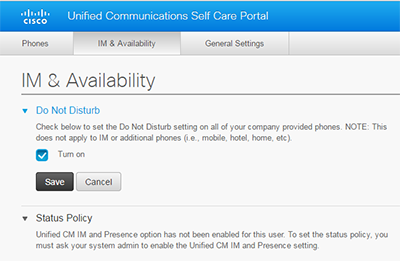
To turn Do Not Disturb off: Deselect.
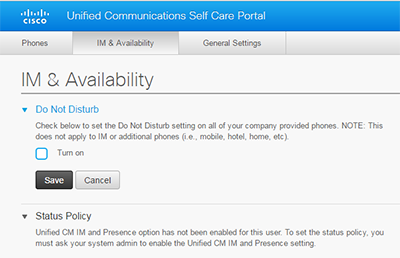
- Click Save.
How to set up and use speed dial numbers
- To add a speed dial number:
- Go to the Cisco Self-Care Portal.
- Enter your username (in the form of firstnamelastname e.g. johnsmith5) in the Username field and your password in the Password field.

- Click Sign In.
- In the left side menu, click Phone Settings.

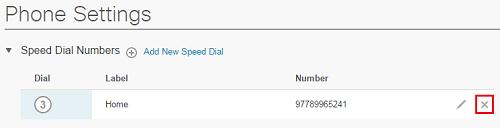
- Click Speed Dial Numbers.
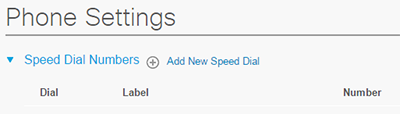
- Click Add New Speed Dial.
- In the new pop-up, enter the required information:
- Number/URI: The extension or 9 followed by the phone number for off-campus numbers
- Label (Description): A short label to remember whose number it is
- Speed Dial: The number you wish to use for speed dial on your phone (1 to 199)
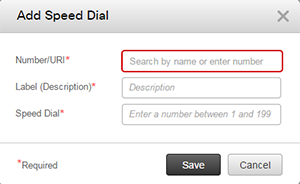
- Click Save.
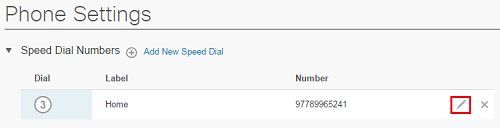
- To modify an existing speed dial number:
- Go to the Cisco Self-Care Portal.
- Enter your username (in the form of firstnamelastname e.g. johnsmith5) in the Username field and your password in the Password field.

- Click Sign In.
- In the left side menu, click Phone Settings.

- Click Speed Dial Numbers.

- Click the pencil icon to the right of the entry.
- Modify the information.
- Click Save.
- To remove an existing speed dial number:
- Go to the Cisco Self-Care Portal.
- Enter your username (in the form of firstnamelastname e.g. johnsmith5) in the Username field and your password in the Password field.

- Click Sign In.
- In the left side menu, click Phone Settings.
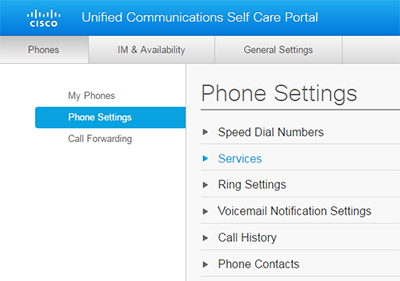
- Click Speed Dial Numbers.
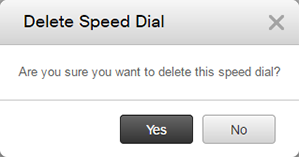
- Click the X icon to the right of the entry.
- Click Yes.
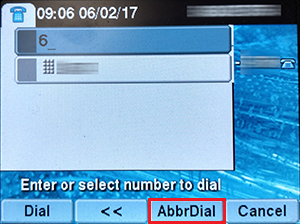
- To use your speed dial numbers:
- While the handset is down, enter the speed dial number on your Cisco office phone.
- Press the AbbrDial button.
- The phone will start dialing, pick the handset if you don't wish to be on speaker.
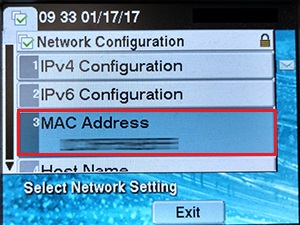
How to find your Cisco office phone's MAC address
- Press the settings button.
- Choose Network Configuration by using the arrow buttons to highlight the option and then pressing the Select button or the checkmark button.
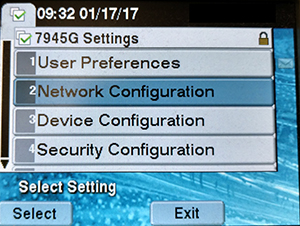
- The phone's MAC address will be presented within the third entry.
Cisco office phone issues
If you are encountering any issues with your Cisco phone, you can try to soft reset the phone:
- Press the settings button.

- Press the following sequence on the number pad: * * # * * (star, star, pound, star, star).
- Allow a few minutes for the Cisco phone to restart. If the issue persists, contact AskIT Service Centre for further assistance.